Welcome to your new IPTV Set Top Box
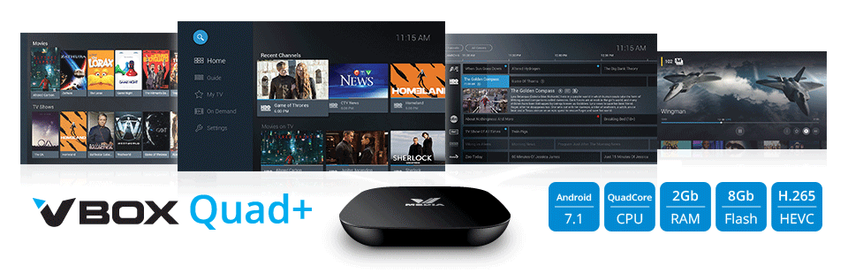
Introducing the IPTV experience - a new way of watching - and your unique set-top box and media player, the VBox. In the following pages, we describe the easy steps to set up your VBox and the best way to enjoy all the features of your VBox.
Connecting your VBOX to your Television
For the best picture quality, we recommend using the HDMI cable to connect the VBox to your TV. If your TV does not have an HDMI connection you may also connect it using the RCA cable.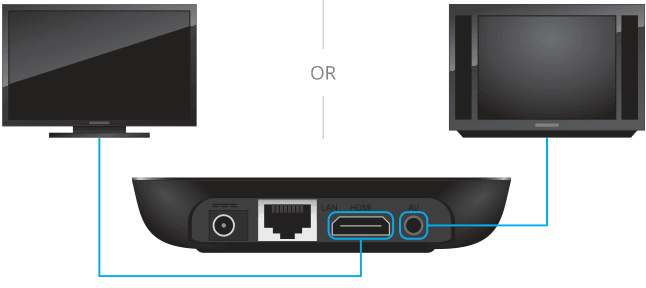
Connecting Power
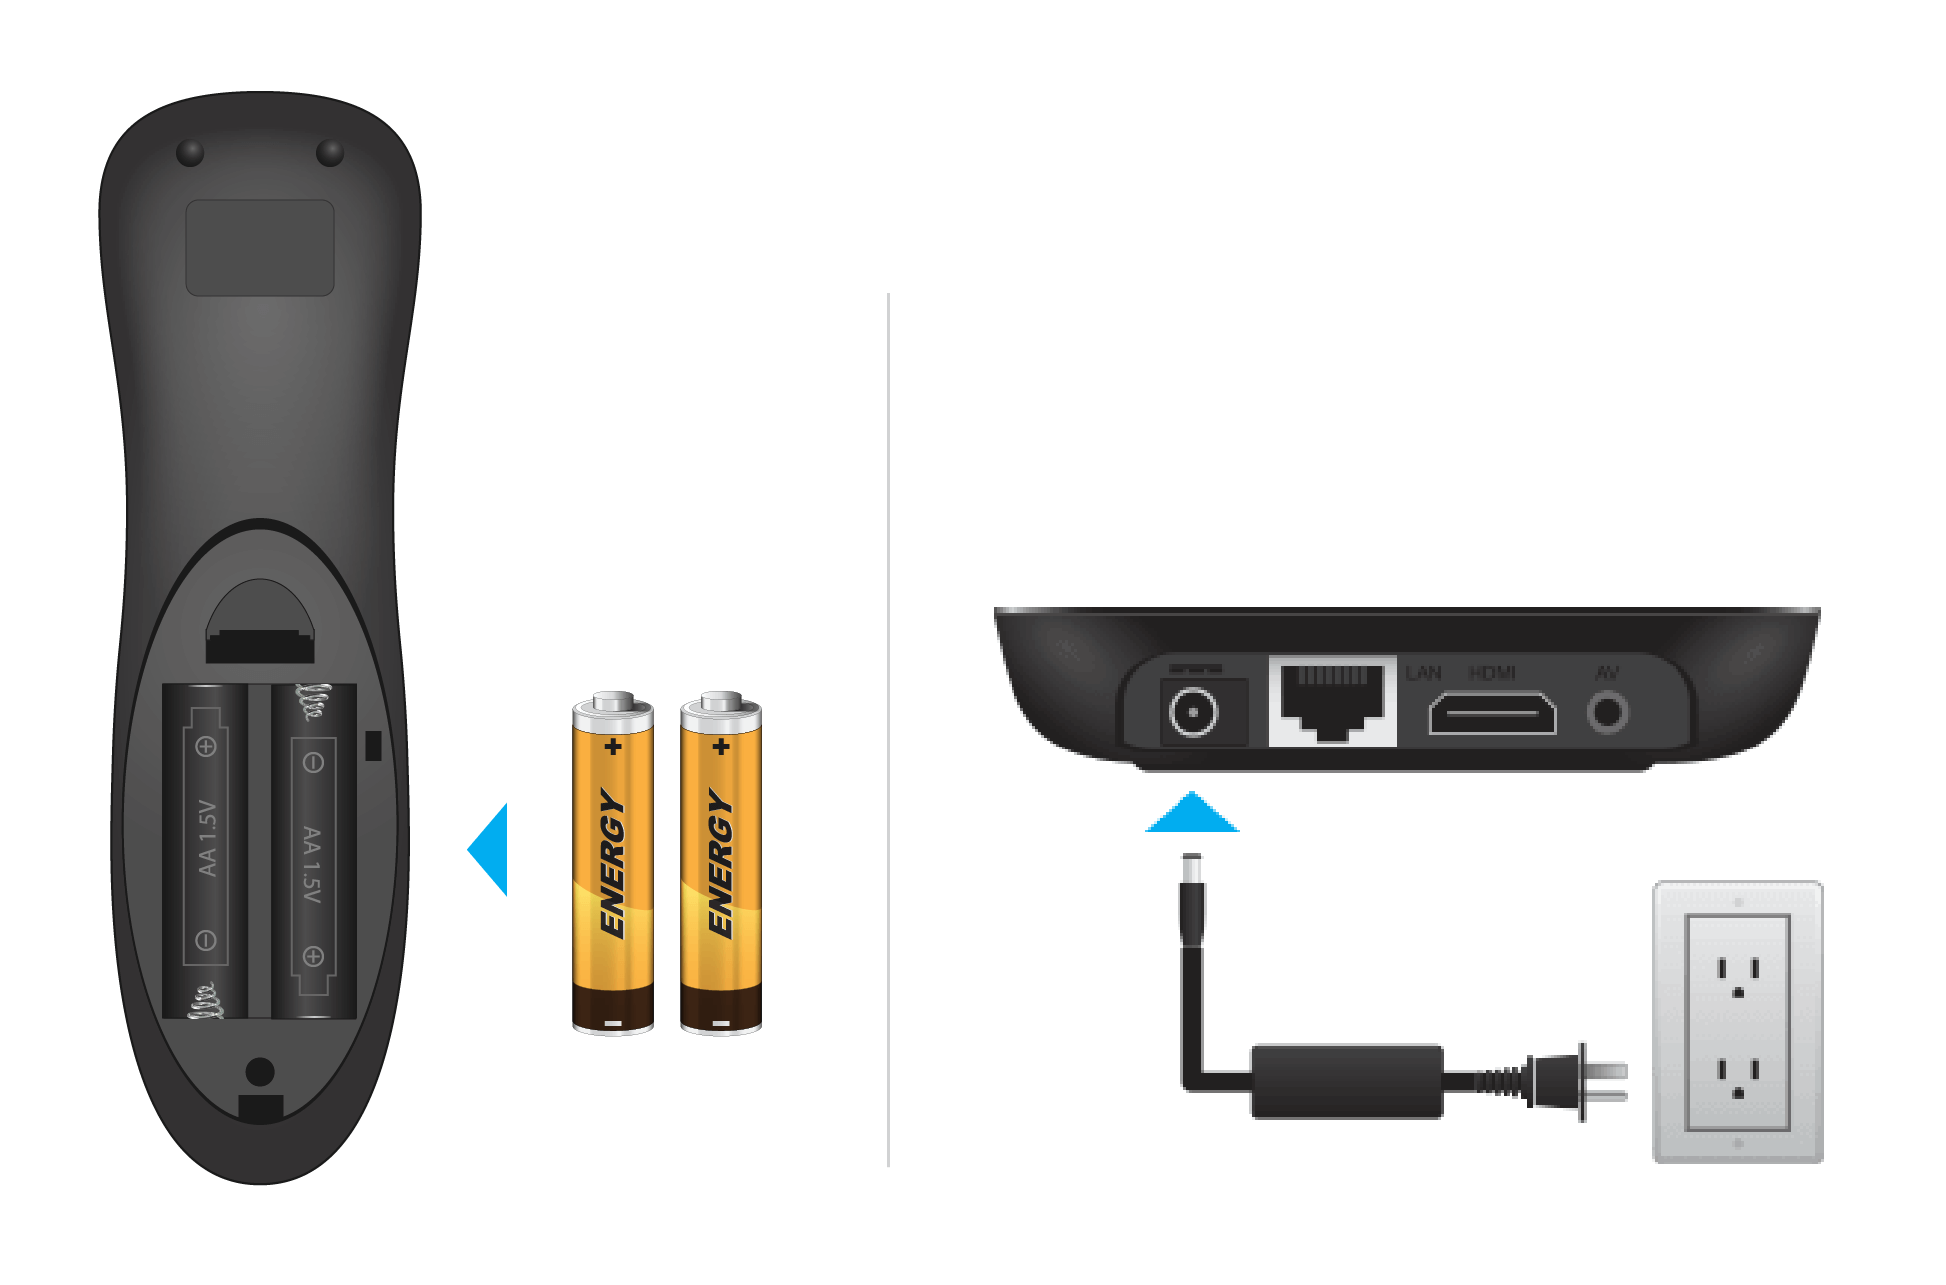
Install the batteries provided in your remote control as shown and connect your VBOX to an available outlet.
Network Connection
An Ethernet Connection is Recommended
Connecting to the internet with the Ethernet provides a more stable connection and avoids potential video buffering. You can locate your router closer to the VBox and TV or use a longer cable to connect the router to your VBox. Plug the Ethernet cable into the LAN port of your modem/router and into the VBox.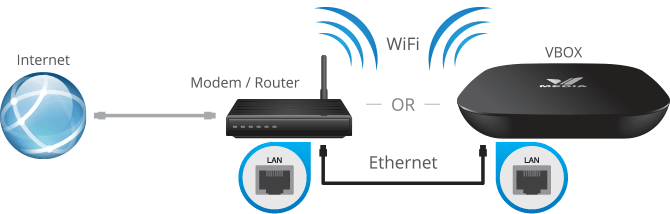
Network Setup and Configuration
Network Set Up allows you to connect the VBox to the Internet either by Ethernet cable (supplied in your VBox package) or wirelessly to your router. We recommend that you connect the VBox to the Internet by Ethernet cable for the best viewing experience.
Ethernet Setup
If you would like to connect your VBox by Ethernet, your VBox will be automatically connected to the Internet once you connect your Ethernet cable to the back of the VBox. Once connected, you will be brought to the Google sign-in screen.
WiFi Setup
On the Wireless settings page, you will see a list of available Wi-Fi networks. Select your Wi-Fi network and enter your network access key.Google Sign In
Press "OK" on the "Sign in" button and sign in with your Gmail account using the onscreen keyboard and your remote. If you do not have a Gmail account, please set one up at Gmail.com (it will come in handy!).
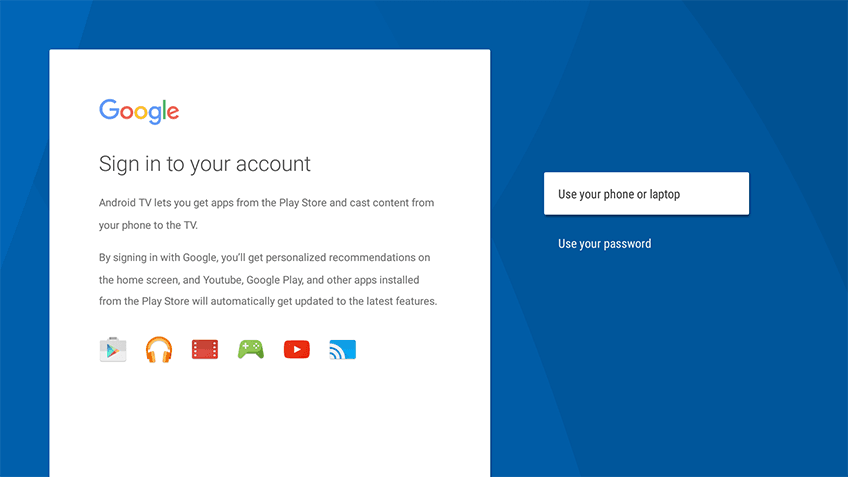
After sign in, please review and accept Google Terms of Service.
You will see a screen saying your initial VBox set up is complete.
Sign In to VMedia IPTV
Locate VMedia under Apps and press "OK". This will take you to the VMedia "Welcome" screen.Display Setup
Select setup if the onscreen image fits your TV from edge to edge. Or, select skip if the image fits your TV to proceed to next screen.
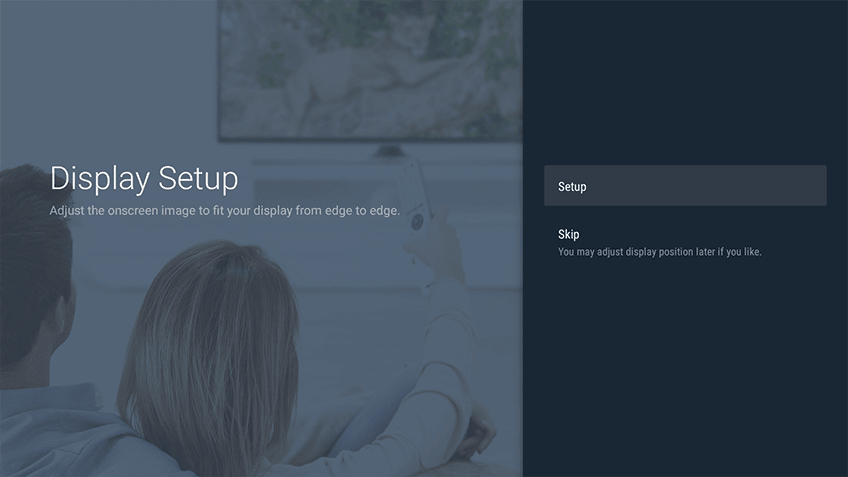
To adjust your screen, select the zoom in or zoom out buttons, until your display fits the entire screen. Hit "Next".
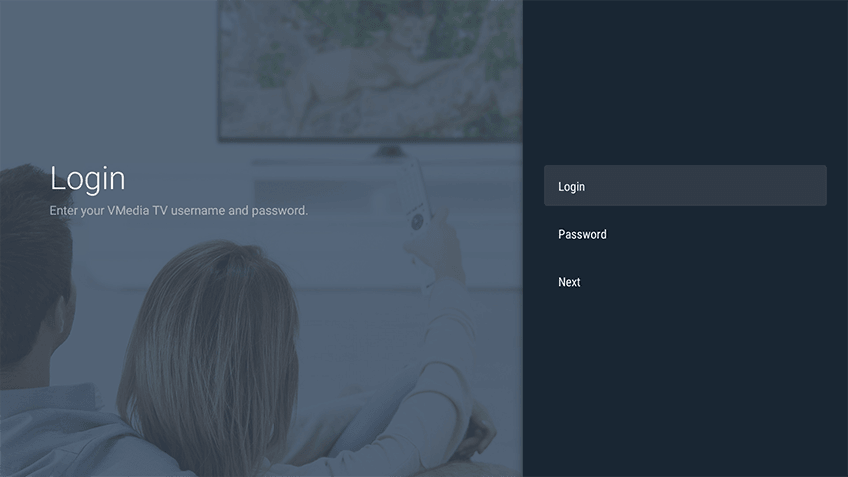
Sign in to VMedia IPTV
Please enter the Username and Password that was emailed to you when you first signed up and login. This will take you to the final steps to complete your VBox set up.
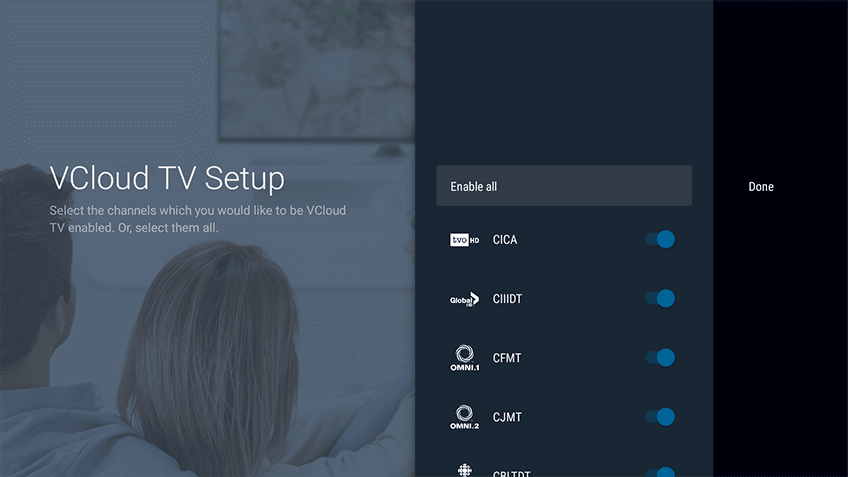
Activate Cloud TV
Your IPTV service includes our innovative VCloud TV. Never miss your favourite programs with easy access to a huge selection of TV shows available on a large number of popular channels. Lots of choice and quick access – it’s always in the cloud!
When you set up your VBox, you will see a series of screens describing the VCloud TV and asking for your authorization to record channels on your behalf. The first screen is a short VCloud TV description, the second will request your approval, and the third will ask you to choose which channels you would like to have recorded for you.
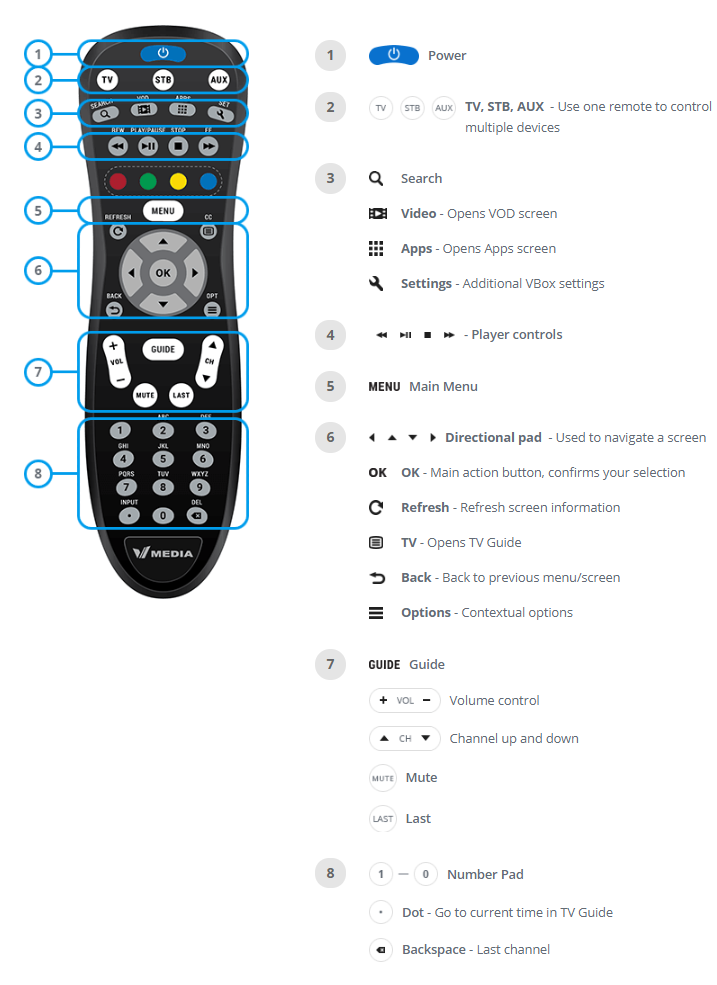
Your Remote Control
Main Menu

The Main Menu is the unique organizing feature of the VBox that gives you seamless access to all your favourite VMedia content. The Main Menu is divided into key sections: Search, Guide, My TV, On Demand and Settings. In order to bring up your Main Menu, press the "Back" button your remote control until it is invoked.
Using The Guide

The TV guide displays all the TV channels, schedule and program descriptions. Just select your program in the TV Guide, click and it will take you to live TV of that show.
The following outlines all the detailed features and options for using the TV Guide with your remote.
Favouriting Channels
To favourite a channel, scroll in the TV Guide to a channel you would like to favourite and press the yellow button on your remote. This will add the channel to your favourites list. You can then choose to display on favourites in your TV Guide by going to the Main Menu, selecting Settings and then selecting Options Menu. In the Options Menu, you can choose to show only Favourited channels in your TV Guide.
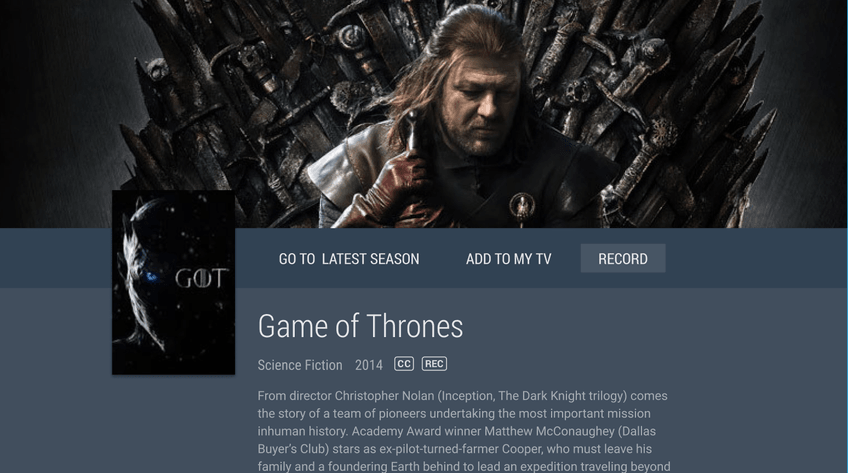
Adding a Programme to My TV
Similar to favouriting channels, you can also mark programmes as favourites by adding them to your My TV. To add a programme to My TV, located the desired programme in your TV Guide, and press the blue button on your remote. You will see a description of the selected programme, and can then choose to add it to My TV. Once it is added to My TV, this programme will be easily accessible for future viewing and allow you to view new episodes quickly and easily.
Parental Control
You can enable parental control in the TV Guide and select both the maximum rating of programming which will be accessible, as well as the length of time for the limitation to remain in place.
If you choose G, only G-rated shows will be shown, if you choose PG-13, only G and PG-13 rated shows will be shown. The time selection allows you to suspend the control for one, two or four hours.
Once you have made your selections, you can engage them by entering your PIN on the pop up screen. Your PIN is in the same initial email containing your user ID and password that was sent when you first signed up for VMedia service.
You can enable parental control by going to the Main Menu, selecting Settings, and then selecting the Options Menu. In the Options Menu, you can then choose your maximum rating, and the length of time this should be enabled for.
Recording TV
VCloud TV
You IPTV service includes our innovative VCloud feature, or "scroll-back" TV, where you can scroll back in the week in the TV Guide, select a show you missed, click and then watch.
VCloud TV gives you access to all the content on a large number of popular channels, including all US and Canadian networks — CTV, CBC, Global, CityTV, NBC, CBS, ABC, FOX, PBS, CW, MyTV, TVO, CHCH, Yes TV, CTV2Barrie, ICI, OMNI, Sportsnet, and many more . A world of content, just a click away.
With VCloud TV, we record all the content for you and store it in the cloud for up to one week from the original broadcast date.
On the initial set up of your VBox, you will be asked to activate VCloud TV and which VCloud channels that you want us to record. If you have provided your consent for VCloud TV, but did not turn any channels "On", you will still be able to record individual shows.
PVR
In addition to VCloud TV, we have "client-side" PVR when you want to record a show that it not on a VCloud channel, or if you want to have access to the content for longer than 7 days. Our PVR allows you to record and save any show, on any subscribed channel, to an SD card or USB drive and then watch it at your convenience.
With PVR, you can record two shows concurrently while also watching TV, or you can set up a recording for a show playing in the future. You may record and store as much TV content as the storage device you are using will allow.
To record a show with PVR:
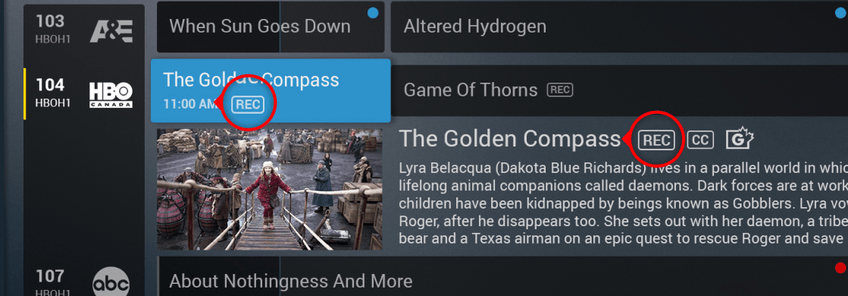
Click on the future airing of the show in the TV Guide by hitting the Red button on your remote. It will set "R" marker on a program to be recorded.
If you want to cancel a recording, press the red button a second time.
Once you have recorded a show, the play icon will be visible in the TV guide.
To watch a show from your PVR recordings, go to My TV in the Main Menu. Here, you will see all the content that has been recorded and saved on your external storage device.
Watching TV
When watching a show, you can enter a channel number on the remote and it will switch immediately to that channel.
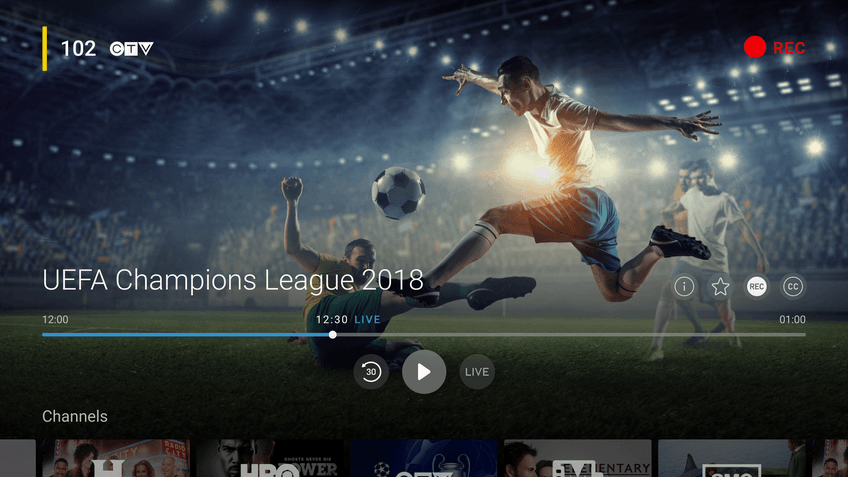
Options – Close Captioning or Descriptive Video
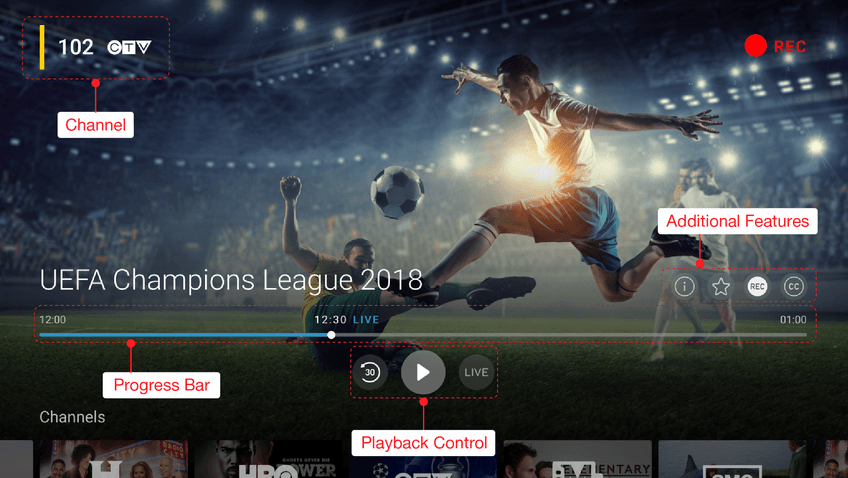
Press the "Options" button on your remote when you are watching TV to enable or disable closed captioning or descriptive video.
On Demand TV
On Demand is a feature that comes with channels in your TV subscription that include On Demand content.
To access On Demand content, select On Demand from the Main Menu. Once you have selected On Demand, you will see all the channels which are On Demand enabled in your TV subscription. Scroll to the channel you wish to access content from, and press OK to view all available titles, sorted in easy-to-navigate categories.
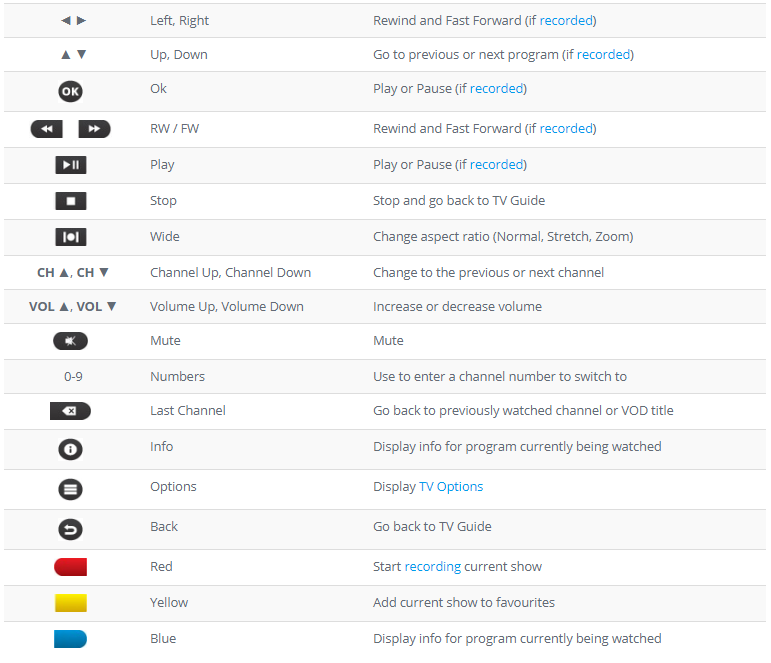
Here are the key commands on your remote for On Demand.
Click on the title cover of the movie or show that interests you and you will see a brief description and the option to start watching. If it is a series, it will give you the list of episodes to choose from. Or, add the programme to My TV for quick viewing.
MY TV
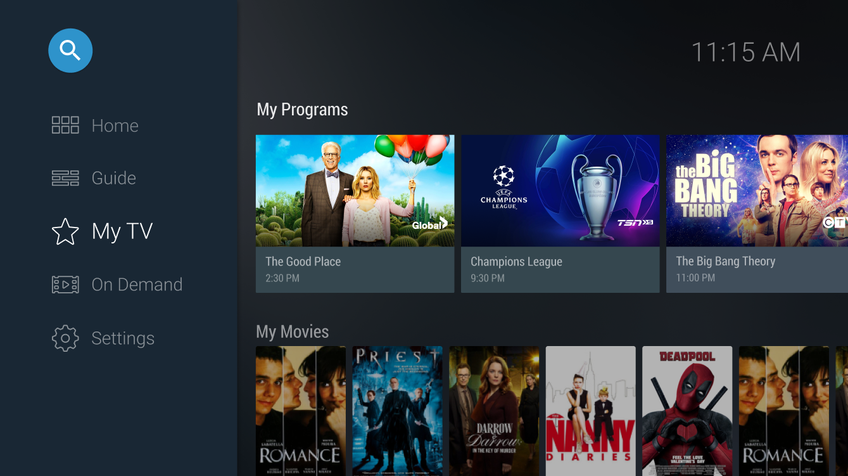
My TV provides you with quick and easy access to your favourite content. Whether it be a TV show, an On Demand movie, or a programme recorded using PVR, it will show up in your My TV section.
To favourite content for My TV, select the "Add to My TV" button on the preview screen of your desired programme. To remove favourited content from My TV, choose the desired programme from the "Favourite Programs" section, and select "Remove from My TV".
Recordings
The "Local Records" section in My TV displays the status, channels and titles for all your PVR content. It is also where you access your own personal PVR library that has been recorded to an SD card or USB drive.
Setup
To enable PVR, simply connect a SD Card, USB thumb drive, or hard drive to your VBox, navigate to My TV and select local storage icon at the bottom of the screen. Here, you will be able to enable your chosen external storage device for PVR recording.
Local Records
The "Local Records" displays programming which is currently being recorded, programming which is scheduled to be recorded in the future, as well as programming which has already been successfully recorded.